Hunting Malware on ARM with AI approach
Using AI for malware detection isn’t new, but the challenge of detecting malicious patterns on ARM architectures brings a fresh set of complexities. ARM processors, widely used in mobile devices, IoT, and embedded systems, operate under different constraints compared to x86 systems. As a result, the attack surfaces and types of malware are also distinct. The ability to leverage machine learning and AI to detect these threats in an efficient and scalable manner is increasingly critical, especially with the growing prevalence of ARM devices in both consumer and industrial applications.
A few years ago, I worked on a project to detect malware using machine learning. It was a simple project based on extracting attributes and headers from PE files. After that, I started thinking about whether it would be possible to detect malicious code using only the instructions, instead of relying on attributes from the binary itself — for example, by analyzing just a shellcode or a portion of memory. So I started working on this project about 4 weeks ago, and I’d like to share the results.
ARM?
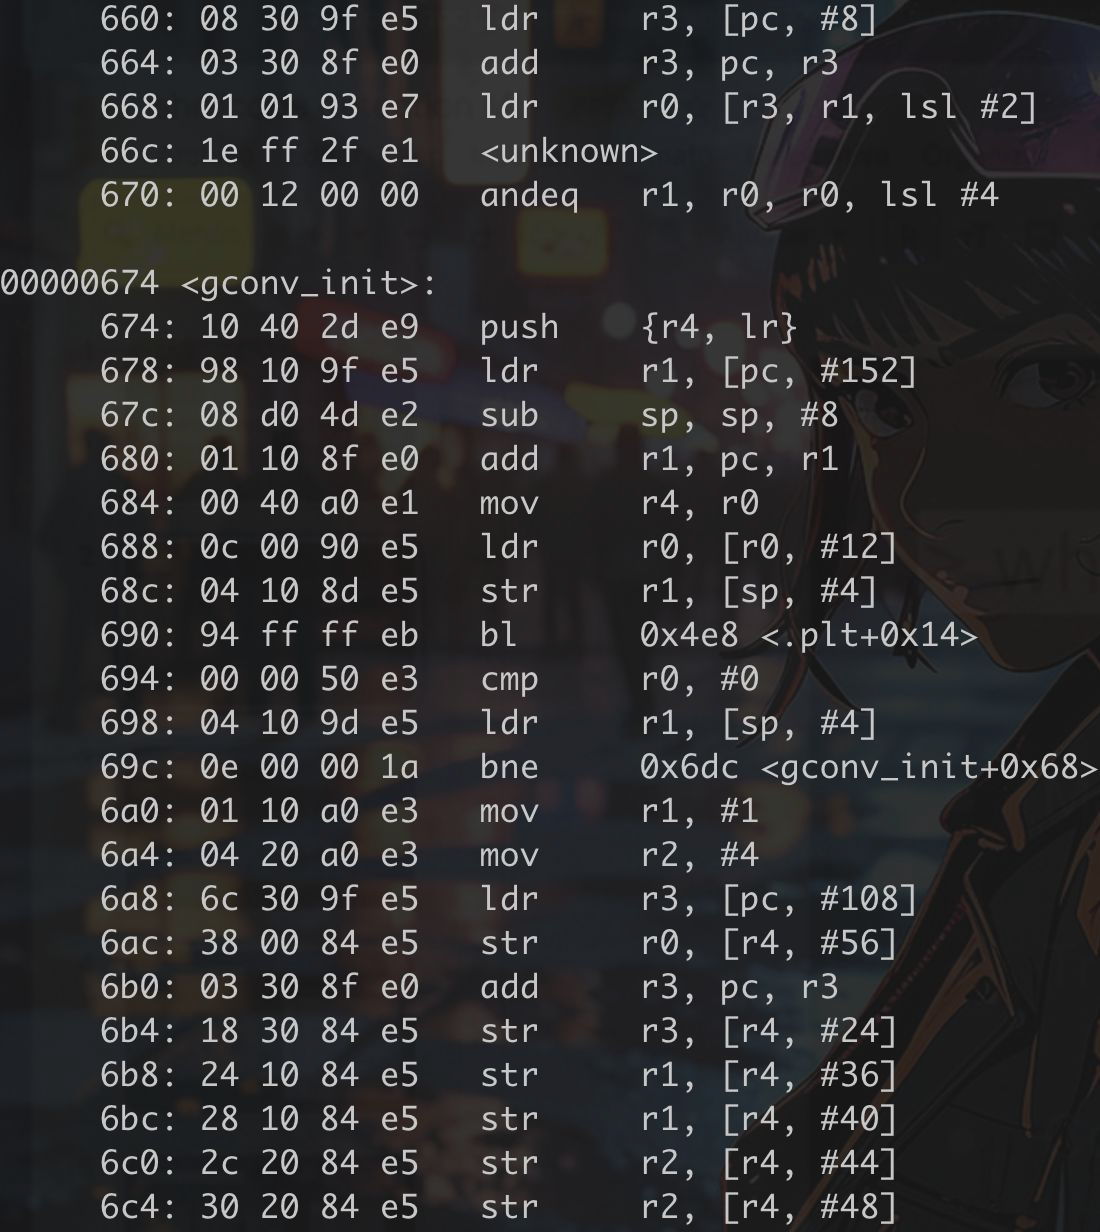
First off, we need to understand what ARM is. ARM (Advanced RISC Machine) is a type of processor architecture that is widely used in mobile devices, embedded systems, and IoT devices due to its energy efficiency and smaller size. Unlike x86 architectures used in most desktop computers, ARM operates on a reduced instruction set, which allows it to perform tasks with lower power consumption. This makes it ideal for battery-powered devices, but it also means that malware targeting ARM systems often behaves differently than malware on traditional desktop systems. As you can see in the next image, the length of the instructions is 4 bytes (though sometimes it could be 2 bytes in THUMB mode, but I’m going to ignore that for now). ARM uses fixed-length instructions in its standard mode, which simplifies the analysis process because each instruction can be treated as a distinct 4-byte block.
Malicious ARM
One of the key challenges in dealing with ARM malware is its subtlety — attackers often use complex techniques to hide their malicious code, making traditional detection methods ineffective. Botnets targeting ARM devices, for example, can go undetected for long periods while exploiting vulnerabilities in networked IoT systems. Similarly, ransomware attacks on ARM-based devices, though less common than on desktop platforms, can be highly disruptive, particularly in the context of critical infrastructure or embedded systems.
Something to keep in mind is that attacks can come from shellcodes through exploitation. In these cases, you don’t have a complete binary to analyze — you’re only dealing with a sequence of raw bytes. Attacks like these are increasingly common, as shellcode is often injected directly into memory through vulnerabilities like buffer overflows or remote code execution. Detecting malicious behavior from just these bytes, without the context of a full executable, requires a different approach. This is where focusing on the instruction patterns themselves becomes critical, as analyzing the raw code can reveal signs of malicious activity even without traditional file-based indicators.
Detection
Detecting malicious binaries is a straightforward task because several attributes can be extracted from the binary, such as headers, IAT/GOT, resources, etc. On the other hand, analyzing shellcode or raw instructions is more challenging since you are dealing only with bytes (instructions), which could be obfuscated.
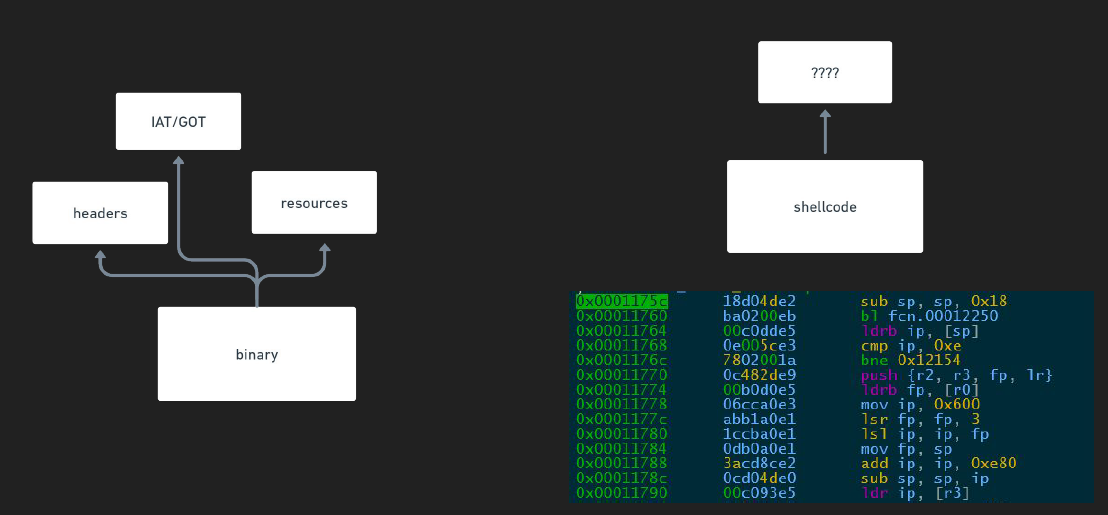
In the previous image, a shellcode is shown, which can be represented as offsets (addresses), bytes (hexadecimal), or instructions. The challenge lies in identifying any malicious patterns within the shellcode. There are many methods to approach this, but in this case, I use deep learning
Deep learning
Imagine you’re trying to detect patterns in complex data, like sequences of instructions in shellcode. Traditional methods might struggle because the data is too complex or disguised. This is where deep learning shines.
Deep learning works by processing data through multiple layers. Each layer picks out different details. In the case of shellcode, early layers might recognize basic instruction sequences, while deeper layers can find hidden patterns, even when the code is obfuscated or disguised.
That is exactly what I used.
In order to train a deep learning model, I need a large dataset of malicious instructions. As you know, finding a big dataset of malicious shellcodes is complicated, so I use a collection of binaries extracted from VirusShare. Instead of reading the entire binary, I focus on extracting the bytes from the code section.
As you may know, I cannot train a model using just raw instructions. I need to convert these instructions into numerical representations, and this is where the first challenge begins.
Building dataset
0x00000001   18d04de2   sub sp, sp, 0x18
0x00000002   ba0200eb   bl fcn.00D12250
0x00000003   00c0dde5   ldrb ip, [sp]
.....
This is the way i have the instructions after extfract them from the binaries. As you can see is kind of tricky to determine if a serie or bytes is malicious or not. The eustion here is how to pass this to a model. First lets think in ways i can pass this instructions into the model as numbers.
As bytes
The most intuitive way is to directly pass the bytes, but this isn’t possible. The reason is that the numbers need to have some sort of relationship between them. For example, imagine representing words with numbers, like this:
cat 100
car 101
dog 110
If we pass this to a model, it would understand that cat and car are similar and even interchangeable. However, in assembly, changing a MOV instruction to a SUB instruction completely alters the result and conveys a different meaning altogether. Check the next image to understand this.
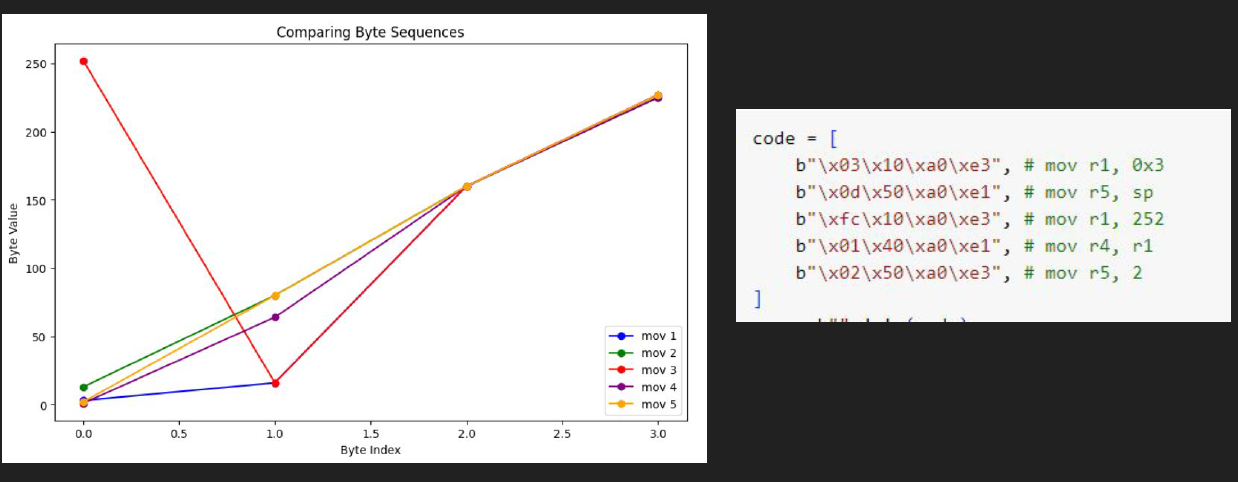
The previous image illustrates my point. It shows five example instructions and their byte representations. In the left graphic, the bytes are plotted in a plane. As you can see, all the instructions appear similar, and when processed by the model, it might interpret them as practically the same (though it’s more complex than that, and I’m simplifying for clarity). This is not a good option for training the model because we know that these instructions are different and produce distinct results, even though they are all MOV instructions.
As Instructions
Another approach could be passing the instructions itself, of course having the bytes i can transform these bytes into ASM instructions by using capstone or any similar library. But let take a look to the next image.
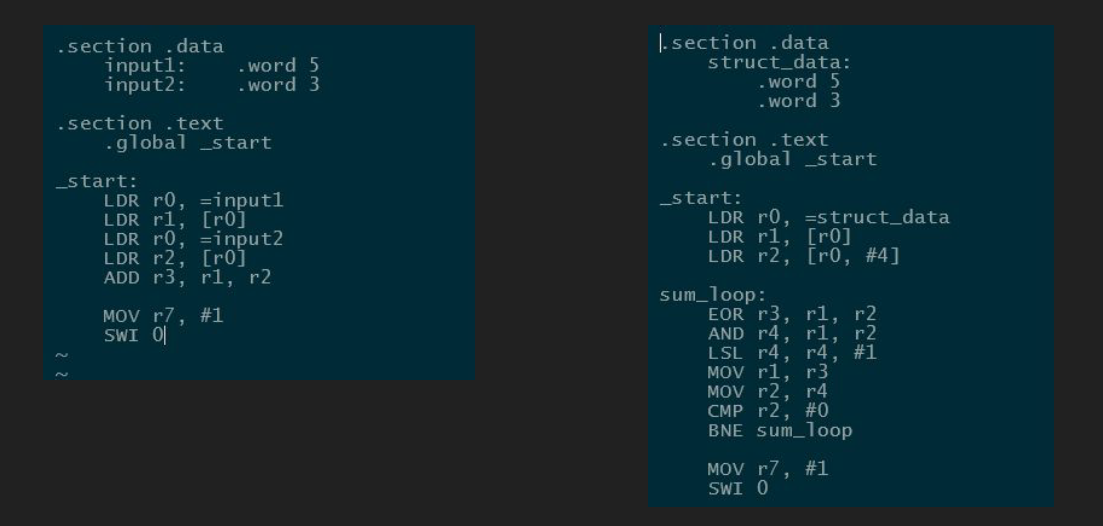
Both sequences of instructions perform the same operation: summing two numbers. However, as you can see, the instructions are very different. In the right image, I’m not even using the mnemonic ADD. Another difference is that in the left image, I am passing two integer inputs, while in the other, I am passing a struct. But what does this mean? Essentially, there are many ways to write a function, with various possibilities. For instance, another function might have three or four parameters. You can infer what arguments are being used based on the registers, but it won’t be deterministic.
So, if I train the model using the numeric representation of the instructions, it could easily be bypassed, leading to inconsistent predictions.
Solving the problem
As you can see, it’s not so simple to build the dataset needed to train a deep learning model. It’s essential to find a way to represent the flow and instructions within a dataset. The best approach is to use a structure that remains consistent and could represents a malicious flow.
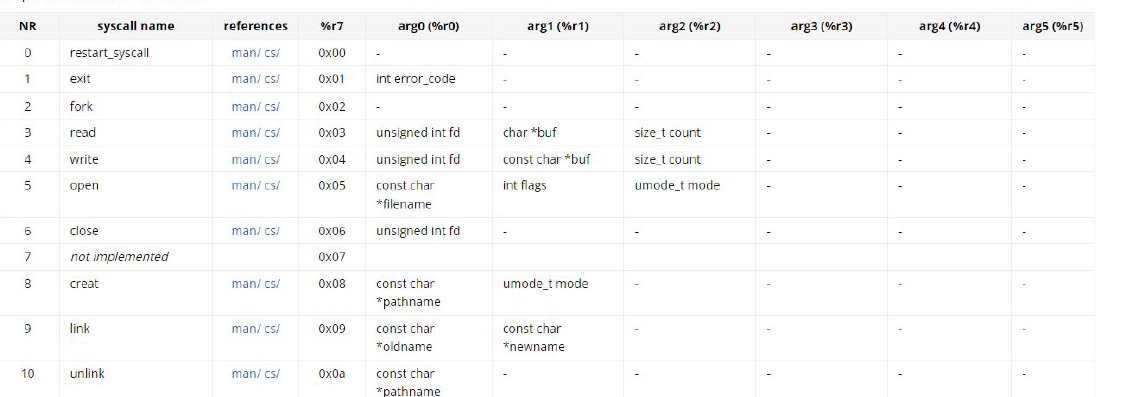
Syscalls are fundamental interfaces that allow programs to request services from the operating system’s kernel. You can invoke these functions and know the arguments you’ll need. Additionally, the flow for each type of malicious activity is often similar. This consistency allows us to establish patterns in the way malicious operations are carried out, making it easier to detect and analyze potentially harmful behavior within the dataset. Let’s take a look how tit works
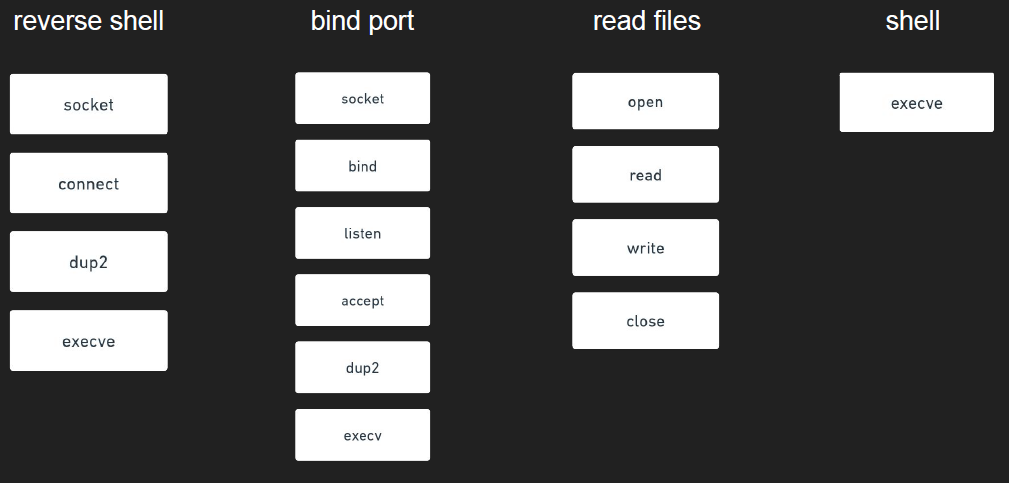
In the previous image, you can see that the pattern flow for each type of malicious task can be determined by its syscalls. Despite the presence of various other instructions, such as obfuscations and junk code, the critical factor is the sequence of syscalls. However, benign syscall sequences can sometimes be mistaken for malicious activity.
For example, the combination of open, read, write, and close is commonly used by many applications to read files, which does not necessarily indicate a malicious task. Therefore, we need additional information to better understand what the code is attempting to do: the arguments. Let’s take a look at the next image.

Now that you have more context about what each function does based on its arguments, reading the file /etc/passwd appears suspicious. While none of this definitively indicates that the syscall sequences and arguments are malicious, they do exhibit suspicious behavior, which is what I’m trying to detect.
So, the data I extracted to train the model consists of syscall sequences and their arguments. However, I faced another challenge: how to obtain the syscalls. I have two approaches: using static extraction or dynamic extraction based on emulation. Let’s check how to solve this.
Static approach
The easiest way is to extract the bytes from the binary, but there’s a big problem with that. Most malware obfuscates its code, making it difficult to determine the real flow until it’s executed. Another major issue is that the syscall sequence in static analysis could be entirely different from what occurs during execution, due to JMP or CALL instructions that can alter the flow dynamically.
Dynamic approach
The other way is to obtain the syscall sequence by emulating the malware. To do this, I used Qiling, which allows me to emulate the instructions. This approach is the best option for accurately determining the real flow of the malware.
To perform the emulation, it was quite simple. I just needed to specify where the binaries are located and set up the root filesystem (rootfs). To capture the syscalls, I hooked them in a generic way, using an approach like this:
def generic_hook_syscall(ql, *params):
        str_args = []
        for p in params:
            if ql.mem.is_mapped(p, 0x1):
                try:
                    string = ql.mem.string(p)
                    str_args.append(string)
                except:
                    str_args.append("ADDRESS")
            else:
                str_args.append(hex(p))
        put_line(ql, filename, time.time(), str_args)
        hf.flush()

        syscall_name = arm_syscall_table.get(get_syscall(ql), None)
        print("syscall: ", syscall_name, params)
        return (ql, params)
In this way, I can capture the string if it is valid; otherwise, the feature will be assigned the value “ADDRESS.” This is because I don’t need the actual address, just the confirmation that it’s valid. Additionally, I needed to extract the syscall ID. In ARM, the ID is stored in the R7 register, so using an approach like this will work.
def get_syscall(ql):
    isize = ql.arch.pointersize
    ibytes = ql.mem.read_ptr(ql.arch.regs.arch_pc - isize, isize)

    svc_imm = ibytes & ((1 << ((isize - 1) * 8)) - 1)

    if svc_imm >= 0x900000:
        return svc_imm - 0x900000

    if svc_imm > 0:
        return svc_imm

    return ql.arch.regs.read('r7')
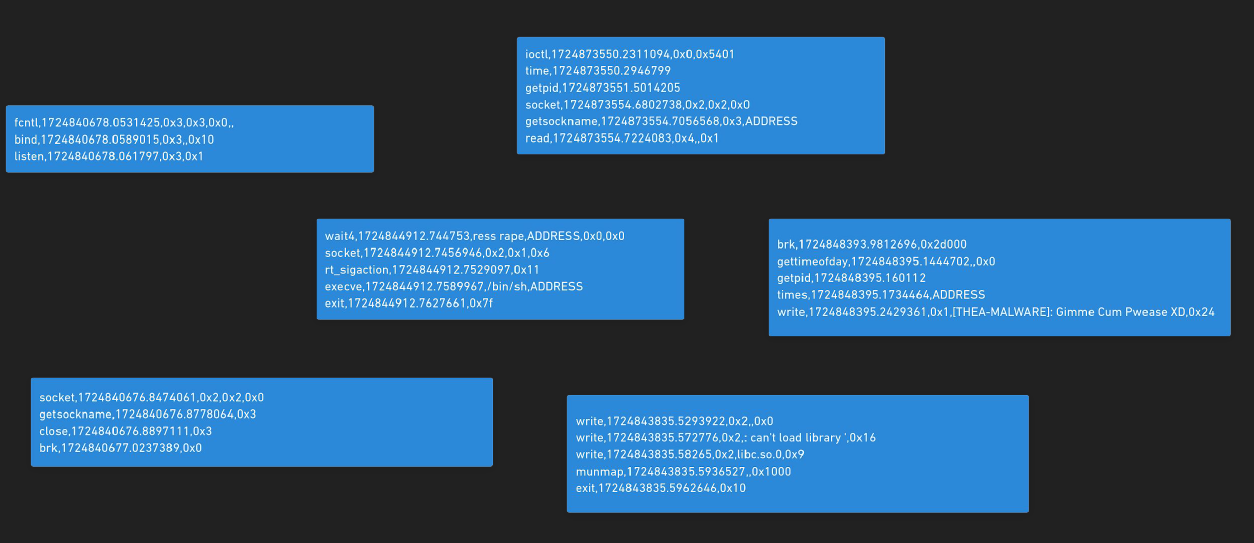
And that’s all for the emulation process. Running each sample gave me an output like this:
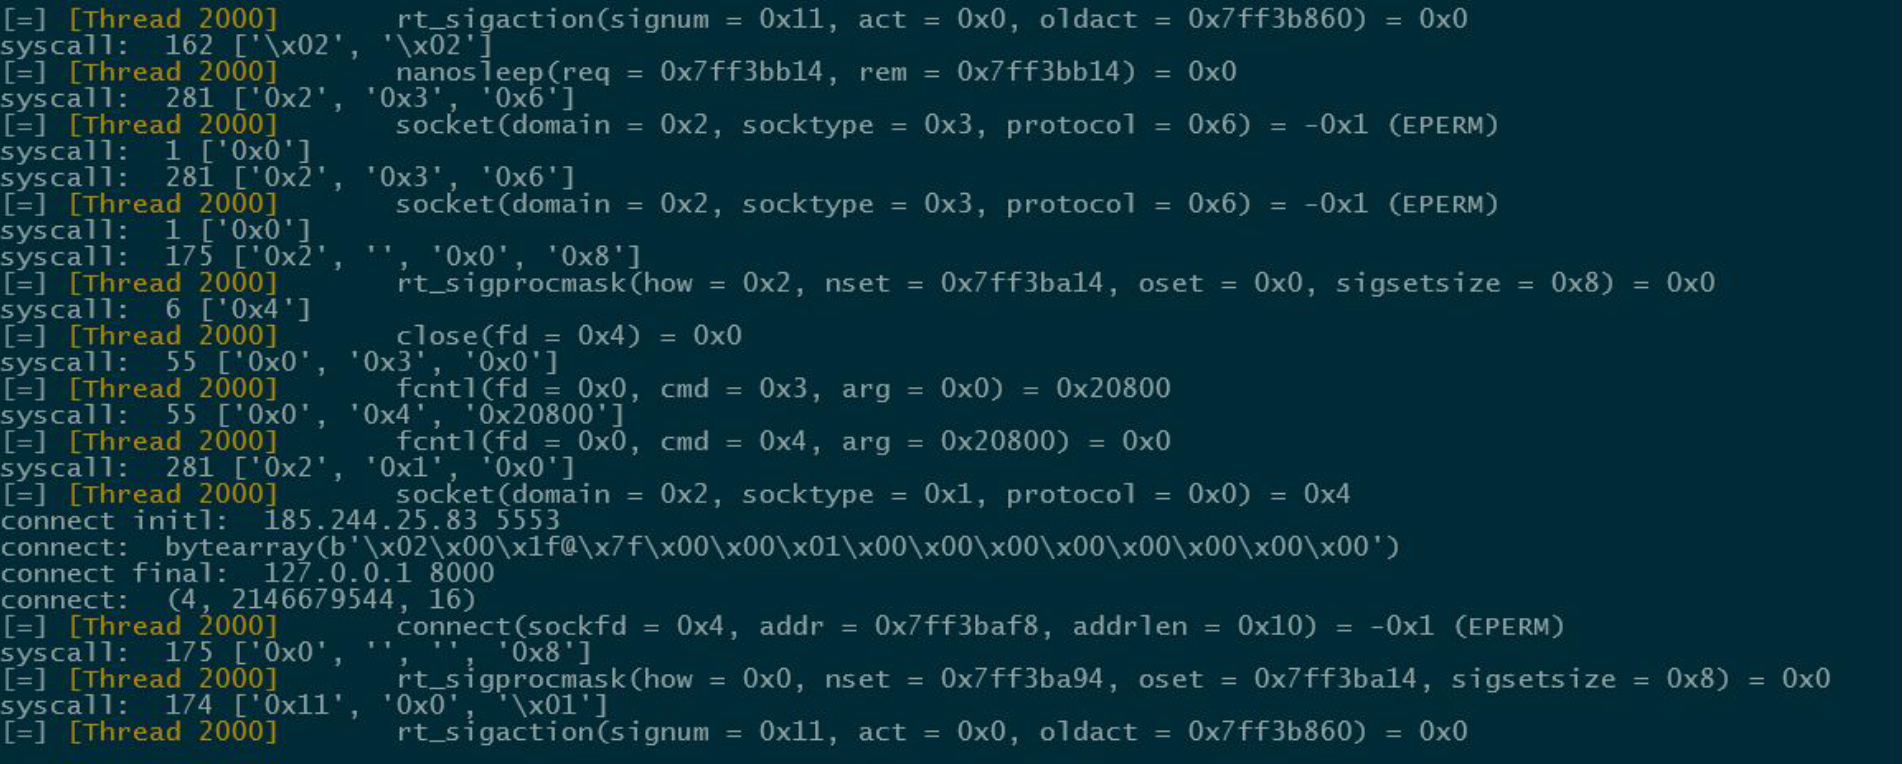
Of course, for some syscalls like connect, read, socket, send, etc., I had to create custom hook functions because I needed to translate structures into meaningful information for the dataset. This step is important because, otherwise, the model would receive just addresses with no context or relationship. Simply pointing to a structure tells nothing about the actual parameter.
Training
Building the dataset and training the model were the most complicated tasks in malicious pattern detection. To get a high-level understanding of what I needed to do, take a look at the next graphic.
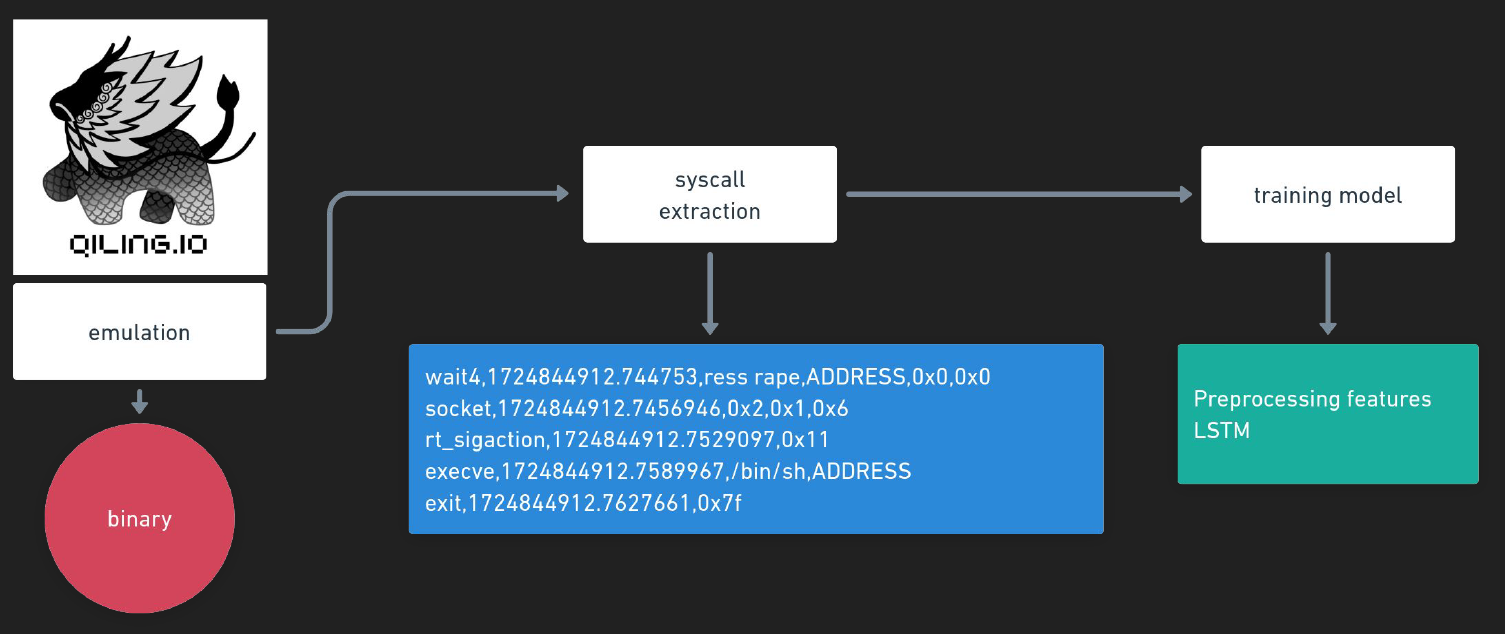
First, I had to extract the syscall execution along with its arguments. After building the dataset, I then created an RNN model (LSTM) to compute the syscall sequence and its arguments. But first, what is an RNN?
Recurrent Neural Network (RNN)
Understanding what an RNN is easy. First off, we have to think of a neural network designed to handle sequential data. Unlike traditional neural networks, which assume that inputs are independent of each other, RNNs are designed to retain information about previous inputs in the sequence. This is particularly useful for tasks like time series prediction, language modeling, or, in this case, syscall sequence analysis.
RNNs use loops within the network to pass information from one step of the sequence to the next, allowing them to capture temporal dependencies in the data. Each hidden state of the RNN is influenced not only by the current input but also by the previous hidden state, making it ideal for processing sequences of syscalls and their arguments.
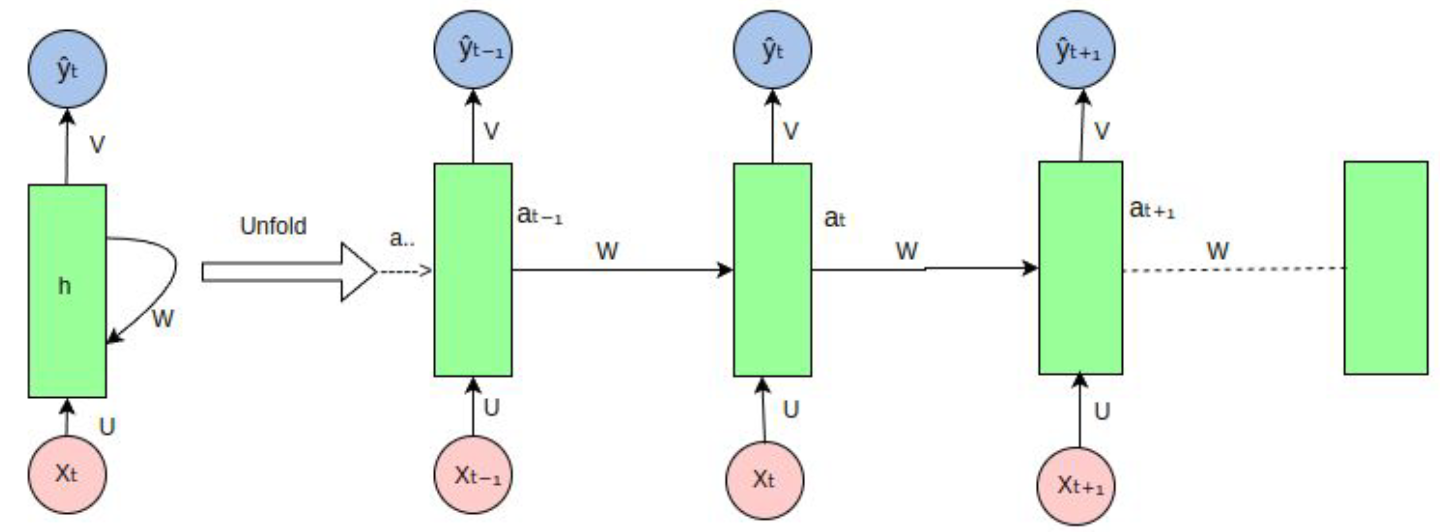
However, standard RNNs suffer from issues like vanishing gradients, which is why Long Short-Term Memory (LSTM) units are often used. LSTMs improve upon traditional RNNs by better retaining important information over long sequences, which is key when analyzing syscall patterns in malware detection.
In order to understand this take a look of the next graphic:

The model won’t be able to “remember” the very first syscalls in the sequence, which could lead to misleading predictions. For this reason, using LSTM will be our best option to retain the complete sequence in memory. Compare this with the next image, where the dataset is trained with LSTM. This is possible because LSTMs create a memory cell that allows them to store and access information over longer sequences, effectively mitigating the vanishing gradient problem and enabling the model to capture important dependencies in the data.

Features
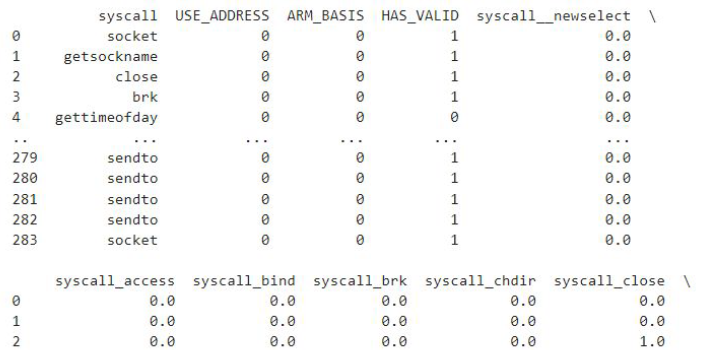
The last part before training the final dataset is defining the features. For instance the first version of the data set looked something like this:
A lot of the data is inconsistent; for instance, in some cases, I have numbers that represent file descriptors or offsets. These values are not useful for me because they don’t contribute meaningfully to the training. Telling the model that my file descriptor is 4 or 5 doesn’t matter.
So, I needed to create a new dataset with custom features extracted from the previous data. Some of the features I included are:
- NON_ZERO: Indicates whether we are dealing with junk code or an invalid syscall.
- VALID_ADDRESS: Indicates if there is at least one valid address present.
- ARM_BASIS: Contains critical folders or files (e.g.,
/etc/passwd,/bin/sh, etc.).
Finally, I needed to apply one-hot encoding for the syscall sequence because I was looking for a deterministic treatment of the features. This is important because, for example, if the syscall ID for read is 10 and for close is 11, the model might incorrectly relate them due to their proximity. However, in reality, they don’t share any meaningful relationship. For that reason, I use one-hot encoding (using 0s and 1s) to encode the features. It may be useful to add more features later, but for now, these will suffice to test whether the model works for me.
Building the LSTM Model
The last part of this research is to create the model and use the data built to train it. This part is a little bit tricky because, as I mentioned before, I already have the ‘almost’ final version of the dataset. However, there is one thing I will need before moving on to the model.
Check this syscall sequence:
socket
connect
getsockname
close
brk
brk
listen
read
By itself, the flow is not malicious. Of course, it could be considered potentially dangerous, especially if it includes something like calling execv or reading/writing important files. Now, regarding that, I created sequences from 2 to 10 lengths using a sliding window, which gave me something like this:
socket
connect
getsockname
close

connect
getsockname
close
brk

getsockname
close
brk
brk

....
Now, when grouped, I can see that there are many sequences that definitely aren’t malicious, for instance, the last one. Another issue is that the model works by predicting the next element in the syscall. For example, if when I am testing I pass this:
getsockname
close
??
The next syscall will be brk based on the data. However, how does this prediction indicate that it is actually a malicious sequence? To solve all these issues, I had to create a new element for each end sequence—an element that tells me when the syscall sequence ends and when I am dealing with a complete malicious syscall sequence (or at least potentially dangerous). I cannot add this to each sequence created because, for instance, if I put END, NULL, NULL, … at the end of each sequence, the model will interpret that any syscall could be followed by END, and this is not the case.
Now it’s time to create the model. In this case, I worked with the following architecture:
optimizer = Adam(learning_rate=0.001)
sysmodel = Sequential()
sysmodel.add(LSTM(128, return_sequences=True,
             input_shape=(X.shape[1], X.shape[2])))
sysmodel.add(Dropout(0.2))
sysmodel.add(LSTM(64, return_sequences=True))
sysmodel.add(Dropout(0.1))
sysmodel.add(LSTM(32, return_sequences=True))
sysmodel.add(GlobalMaxPooling1D())
sysmodel.add(Dense(32, activation="softmax"))
sysmodel.add(Dense(y.shape[1], activation="linear"))
# sysmodel.add(Activation('linear'))
sysmodel.compile(loss='mean_squared_error',
                 optimizer=optimizer, metrics=['accuracy'])
- I have several LSTM layers to enable the model to learn hierarchical representations of syscall sequences, with the first layer capturing lower-level features and subsequent layers refining them into more complex patterns.
- I added Dropout to prevent overfitting by randomly disabling a fraction of the neurons during training, which encourages the model to learn robust features that generalize better to unseen data.
- Finally, the GlobalMaxPooling1D layer helps me reduce the dimensionality of the output from the LSTM layers by selecting the maximum values across the entire sequence, allowing the model to focus on the most significant activations and providing a fixed-size output for the subsequent dense layers.
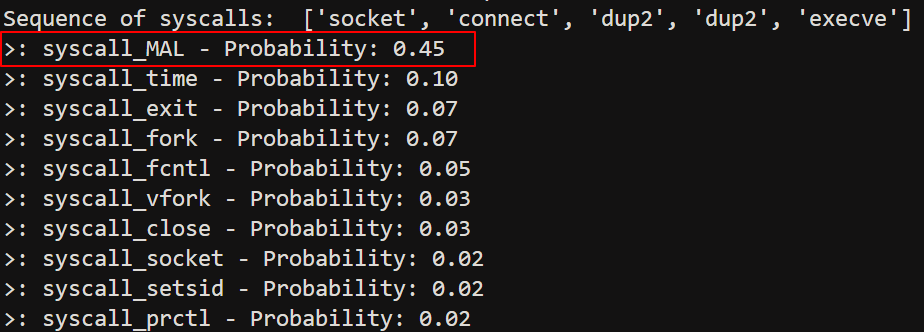
That’s all about the training. It took several hours to complete the process, and after obtaining the model, it was stored. For example, I used this shellcode to test the detection: https://packetstormsecurity.com/files/151392/Linux-ARM-Reverse-Shell-Shellcode.html. After emulating the shellcode, I obtained this syscall sequence with some arguments that were encoded.
socket
connect
dup2
dup2
execve
And the result of the detection is syscall_MAL with a probability of 0.45. Of course, this shellcode is very conventional.
Conclusion
Well, this is just an idea about how to detect malicious syscall sequences in ARM, but of course, it could work with other architectures. With this very simple approach, it could be possible to detect, in real time, some malicious activities on embedded devices. The next steps should involve collecting more specific shellcodes instead of grabbing entire binary sections.